Selenium Grid 4 is almost officially here, and it has a ton to of new features. I have been experimenting with some of them the past couple months now and have been quite impressed with how flexible yet simple it can be. I am huge fan of running the grid with docker and the dynamic grid beta came out around the time I started to dive in. I gave it a shot and it is a pretty nice and simplistic grid implementation! A docker-compose file and a configuration file are all you really need to get yourself started. (Well, and some dev tools, of course)
What is the Dynamic Grid?
It is more or less exactly what it sounds like, a selenium grid that can grow and shrink dynamically as needed for your browser testing needs. I won’t try to say it any better than the SeleniumHQ/docker-selenium developers themselves:
Grid 4 has the ability to start Docker containers on demand, this means that it starts a Docker container in the background for each new session request, the test gets executed there, and when the test completes, the container gets thrown away.
This execution mode can be used either in the Standalone or Node roles. The “dynamic” execution mode needs to be told what Docker images to use when the containers get started. Additionally, the Grid needs to know the URI of the Docker daemon.
Creating the Dynamic Grid
What you will need:
- IDE of your choice (I like VS Code) or use notepad or another text editor if you enjoy suffering more than you have to.
- Docker Desktop to run our dynamic grid and spin up new container nodes as needed.
*Note: I am doing this on Windows 11, but as long as there are no specific windows file paths this should work anywhere you have docker.
Create the needed files (files will be explained later)
- Create either a new git repository or just a new folder will work fine.
- Open the repository/folder and create a docker-dynamic-grid.yaml and a config.toml file and open them up in your editor IDE. In VS Code I now have this:

Add the needed yaml for the docker compose file and configurations to the .toml file:
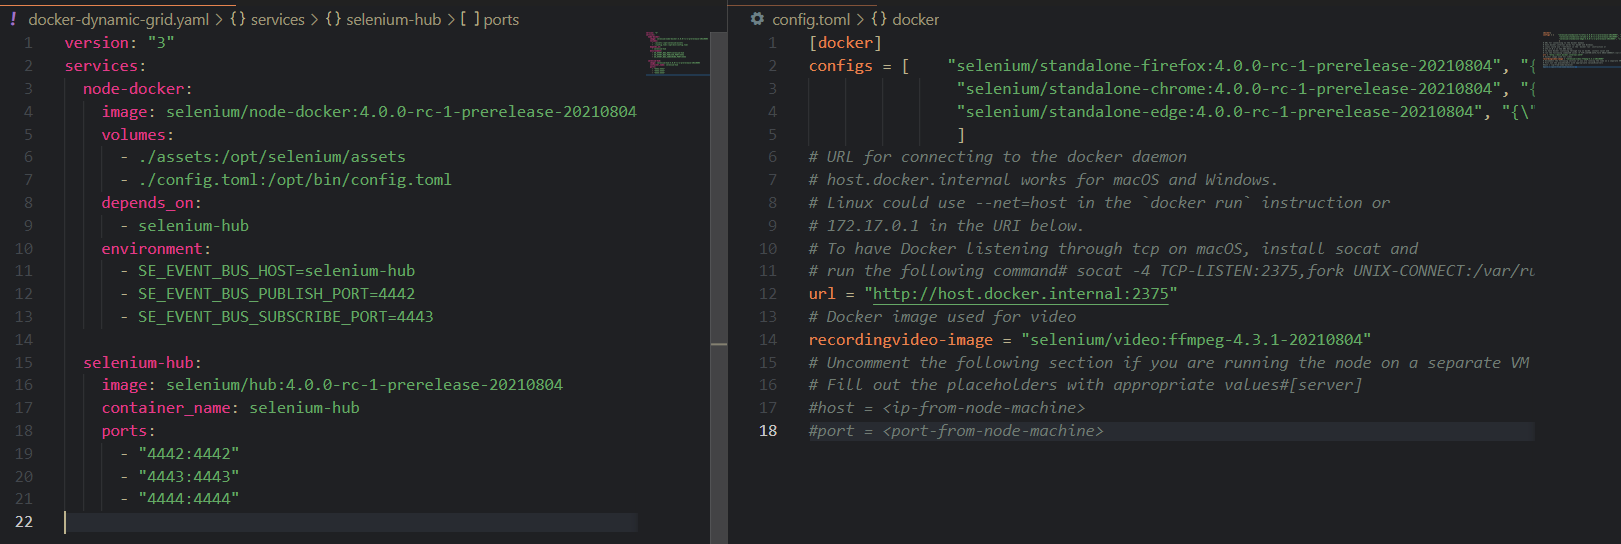
- Add the following to the docker-dynamic-grid.yaml file, but if you did not open a folder or repo with both files in it replace the ./config.toml with the path to where you created the blank config.toml file:
version: "3"
  services:
    node-docker:
      image: selenium/node-docker:4.0.0-rc-1-prerelease-20210804
      volumes:
        - ./assets:/opt/selenium/assets
        - ./config.toml:/opt/bin/config.toml
      depends_on:
        - selenium-hub
      environment:
        - SE_EVENT_BUS_HOST=selenium-hub
        - SE_EVENT_BUS_PUBLISH_PORT=4442
        - SE_EVENT_BUS_SUBSCRIBE_PORT=4443    selenium-hub:
      image: selenium/hub:4.0.0-rc-1-prerelease-20210804
      container_name: selenium-hub
      ports:
        - "4442:4442"
        - "4443:4443"
        - "4444:4444"
What this docker-dynamic-grid.yaml compose file is doing is creating two services:
- First is the node-docker service. Using the specified image to create a container, this node is volume mapping the config.toml file from the host path (left side of the colon) to the container path (right side of the colon). The node depends on the selenium-hub to start, and the environment section is telling the node where the event bus is so that it can register itself to the hub when ready.
- Second is the selenium-hub service. Using the specified image, the hub is mapping 3 different ports to the container so they can be exposed on the host machine. If you have used selenium before you are probably familiar with at least the 4444 port. localhost:4444 is generally the default URL to access a selenium hub and run your web driver tests. The other two ports are because the hub is also acting as the event bus in the dynamic grid configuration rather than the fully distributed mode.
- Add the following to your config.toml file:
[docker]configs =
[    "selenium/standalone-firefox:4.0.0-rc-1-prerelease-20210804", "{\"browserName\": \"firefox\"}","selenium/standalone-chrome:4.0.0-rc-1-prerelease-20210804", "{\"browserName\": \"chrome\"}","selenium/standalone-edge:4.0.0-rc-1-prerelease-20210804", "{\"browserName\": \"MicrosoftEdge\"}"    ]# URL for connecting to the docker daemon
# host.docker.internal works for macOS and Windows.
# Linux could use --net=host in the `docker run` instruction or
# 172.17.0.1 in the URI below.
# To have Docker listening through tcp on macOS, install socat and
# run the following command
# socat -4 TCP-LISTEN:2375,fork UNIX-CONNECT:/var/run/docker.sock
url = "http://host.docker.internal:2375"# Docker image used for video
recordingvideo-image = "selenium/video:ffmpeg-4.3.1-20210804"# Uncomment the following if running the node on a separate VM
# Fill out the placeholders with appropriate values
#[server]
#host = <ip-from-node-machine>
#port = <port-from-node-machine>
In a nutshell, the config.toml file is telling the node which browser container type to spin up when it sends a request to the event bus based on the browserName option that is sent in the capabilities. There is also a docker image that gives the ability to generate a video of the test run — this .mp4 is placed where the ./assets folder is after test run. If applicable, you could also enter the host and port of a separate server you intend on running the node on.
You may have noticed I skipped this because it can be overlooked, but the config.toml also enables connecting to the docker daemon. If you have not exposed it in your settings you may come in to an issue of the node not connecting to the hub. Here is one way in the Docker Desktop settings:

At this point you should be ready to run your dynamic grid. Your files should look similar to this:
Running the Dynamic Grid — We’re Ready
- If you are in an IDE that has a terminal, open it up. If it doesn’t default to the folder with your files in it, then change directory to that.
- If you are not in an IDE, open a command prompt and change directory to where both files were created.
- It is as simple as one command at this point which will start the services in the docker-dynamic-grid.yaml file for us using docker-compose:
docker-compose -f .\docker-dynamic-grid.yaml up - In your output, you will see all the images downloading from docker hub and then will finally see that the hub is UP.

Success! Almost…Let’s make sure the grid is up!
In the last few lines of the output in the picture above, you should see two main indicators and then we have one final check to know that we have success:
- ‘Node has been added’ — this is in the second to last line
- ‘Switching node nodeID … from DOWN to UP’
- The final indicator: open http://localhost:4444 and you should see your new grid and node!

Using the Dynamic Grid to Run Tests
- Point your web driver to use the hub at http://localhost:4444 and as long as you use the browserName of ‘chrome’, ‘firefox’ or ‘MicrosoftEdge’ a node will queue up, get created, and ultimately run your test.
Note: If you were using remote web driver previously, there is no long a need for the ‘/wd/hub’ suffix in the URL with grid 4.
Stopping the Dynamic Grid
- In the terminal you started it, click ctrl+c to gracefully stop the containers.
- Once stopped, we need to use the docker-compose down command
docker-compose -f .\docker-dynamic-grid.yaml down - You should see something similar to this indicating they are stopped

Overall
Dynamic Grid is an easy to use and powerful new feature being added to Grid 4. I look forward to elaborating on some of the other features that not only dynamic grid can take advantage of but Grid 4 and its new distributed model in general.
I hope this helped someone!
